Week 5: Digital Storytelling - Production Video
Week 5: Production Video

Hey everyone, how's everyone doing? All good? By the way, this week's topic is the last topic that I will be blogging about. So, enjoy reading ya.
Let's begin, so on Monday morning 2nd November 2020 I had an online class with my fellow classmates and my lecturer Ms. Amanda. The lecture is about video editing and using which software to edit etc.
So based on my experience in video editing, I have used Microsoft Video Editor, it's basic and easy to edit. As for me, I'm still intermediate to video editing. The current update is so good with Windows 10, You can use it to trim videos or create your own home movies and slideshows. You can even have it create videos automatically.
Getting started
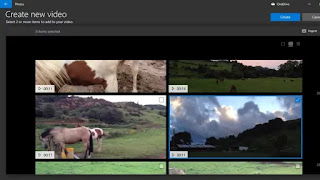 (Image credit: Microsoft)
Click on “New Video” and choose to either create a “New Video Project”, or let the app do all the work for you with “Automatic Video”.
We chose to start with the latter.
When making an Automatic Video, all you have to do is choose the clips you’d like to include and Photos will take care of everything else.
Down this path, your objective is clear: choose two or more clips then click on the big blue ‘Create’ button, and you’re done.
Photos will assemble the movie, add a title, and cut your clips so they fit its self-chosen music. Your work could be essentially done, or you could choose to ‘Edit’ this automatic creation to fine-tune your project.
This takes you to the manual creation process, where you would have gone to had you chosen “New Video Project”, only with some clips already added to your edit.
 (Image credit: Microsoft) Or you could choose a more hands-on approach with full control over the editing process.
 The manual interface
The interface is clean and very simple. You see all the clips present in your Project Library top left, with an option to add additional ones should you need to.
The lower section is your Storyboard, where you see all the clips that have been added to your project. Each one is represented by a rectangular thumbnail of the same size, irrespective of its length. More professional editors display footage based on their duration. The way Photos does mean to simplify the process for people who may have little to no experience with the video editing concept. So instead, they just see all the clips one after the other, as simple blocks to more around or even delete.
Unlike most other video editing apps, you don’t work with layers here. The Storyboard is linear. You can’t add clips above or under it, you just work chronologically, adding one clip after another, and changing that order at will. This keeps the visual process of building a movie simple.
Top right is the preview window where you can see your assembled movie. Whichever frame the play head is on in your Storyboard, will be shown in this section.
 (Photo credit: Microsoft) You can trim a clip to only use the part you want. Which is easy and great.
 The editing tools
The handful of editing tools at your disposal are sandwiched in the middle of the interface. You have the basics, like Trimming clips (making them shorter - or longer), Splitting them (cutting a clip in two to place one or more clips in between the cut, for instance), adding Text to a clip, or a Title card.

(Photo credit: Microsoft) You have various titling options.
You also have more advanced options. Motion allows you to pan and zoom across a clip, should you wish to focus on a specific part of the frame, while ignoring the rest.
 (Photo credit: Microsoft). Play around with 3D effects to add whimsical touches to your project.
 The 3D Effects section lets you add pre-designed animation to a clip. Things like a campfire, or butterflies flying across the screen.

(Photo credit: Microsoft) Or alter the colors of your selected clip to give it a specific mood.
Filters alter the colors of a selected clip with a series of pre-determined options. Just select one and you’re done (you can only add one at a time).
It's all extremely straightforward, it works as you’d expect a dedicated, albeit simple, video editor to work.
The Speed allows you to alter the speed at which the clip is played back: slow them down to make it more dramatic, speed it up for a more comical effect, you get the idea. I definitely feel it’s an odd decision to have done this, especially since it’s not entirely obvious that Windows 10 comes bundled with a free video editor, and could force some people to shell out for some additional software when they wouldn’t have had to.
However, when you do know of these features’ existence, we believe most casual video makers would be more than happy with the tools at their disposal.
Working with your footage is easy. The tools’ depictions are large and friendly, and Microsoft has worked to remove as much of the intimidation of working on a video project as they could.
Obviously, you can't compare towards Adobe Premiere Pro, because that software is super-advanced compare to Microsoft Video Editor. But it actually does a pretty good job at helping someone like me who has no time or no experience, to create something that looks surprisingly good.
The automatic feature is good enough for making a quick video and is also the perfect launchpad to fine-tune your creation further.
Thank you everyone for reading.
Hope everyone enjoys this week's topic, super straightforward about software video editing. This is the end of my blogging. Wish you all the best, please follow the sop's during this CMCO/RMCO.
Take care and stay safe! ✌
-END-
